SCCM / MECM
Theory
The System Center Configuration Manager (SCCM), now (since 2020) known as Microsoft Endpoint Configuration Manager (MECM), is a software developed by Microsoft to help system administrators manage the servers and workstations in large Active Directory environments. It provides lots of features including remote control, patch management, task automation, application distribution, hardware and software inventory, compliance management and security policy administration.
SCCM is an on-premise solution, but Microsoft also maintains a cloud-native client management suite named Intune. Both Intune and SCCM are part of the "Microsoft Endpoint Manager" umbrella.
Topology
SCCM operates in a client-server architecture deployed on a "site", representing the SCCM environment. The following components may be found in an SCCM installation:
- Primary Site Server: the main SCCM server that manages clients (like distributing software updates) and can have child servers attached to it for scalability purposes. Each SCCM site is identified by a three-character code to distinguish it in an SCCM hierarchy.
- Secondary Sites: child servers attached to a primary site server, generally deployed for scalability purposes.
- Passive Site Server: a high-availability component that can be failovered to, if an active Site Server stops.
- Management Point (MP): an SCCM server role that sits between the site server and clients, providing clients with necessary policies and configuration to communicate with the site server and receive configuration data from them. The management point also uses the site database to retrieve policies and configuration information needed by SCCM clients.
- Distribution Point (DP): the SCCM component that hosts and distributes software packages, updates, OS images, etc. to clients upon request.
- Site Database Server: a Microsoft SQL Server (MSSQL) instance that stores all information about clients, software updates, hardware and software inventories, configuration settings of the site, etc. This database is used by the site server to retrieve and store information about managed devices.
- SMS Provider: provides a set of interfaces between the site server and the site database. It exposes WMI and the AdminService REST API to admin consoles and tools (such as the Configuration Manager console) to read and manage site data. Note that clients do not communicate with the SMS Provider — they communicate with the Management Point instead. "SMS" stands for "System Management Service".
- Central Administration Site (CAS): an optional component used in large environments that host multiple SCCM sites (e.g. a huge company, with one SCCM site per continent). It manages all the primary sites from one point, does some reporting, and is totally optional.
- Boundary Groups: a set of network locations allowing clients to communicate with the SCCM closest resources in an SCCM site. Boundary groups also allow for automatic site assignment for discovered clients based on their network location to attach them to the right site and ensure they receive the right configuration.
- Clients: each client (server or workstation) has an agent installed used to communicate with its SCCM server. Each SCCM site is identified by a three-character code to distinguish it in an SCCM hierarchy. This is needed at the client registration process.
All of these components can be installed on a single physical server, or dispatched between multiple servers for load balancing purposes, for example.
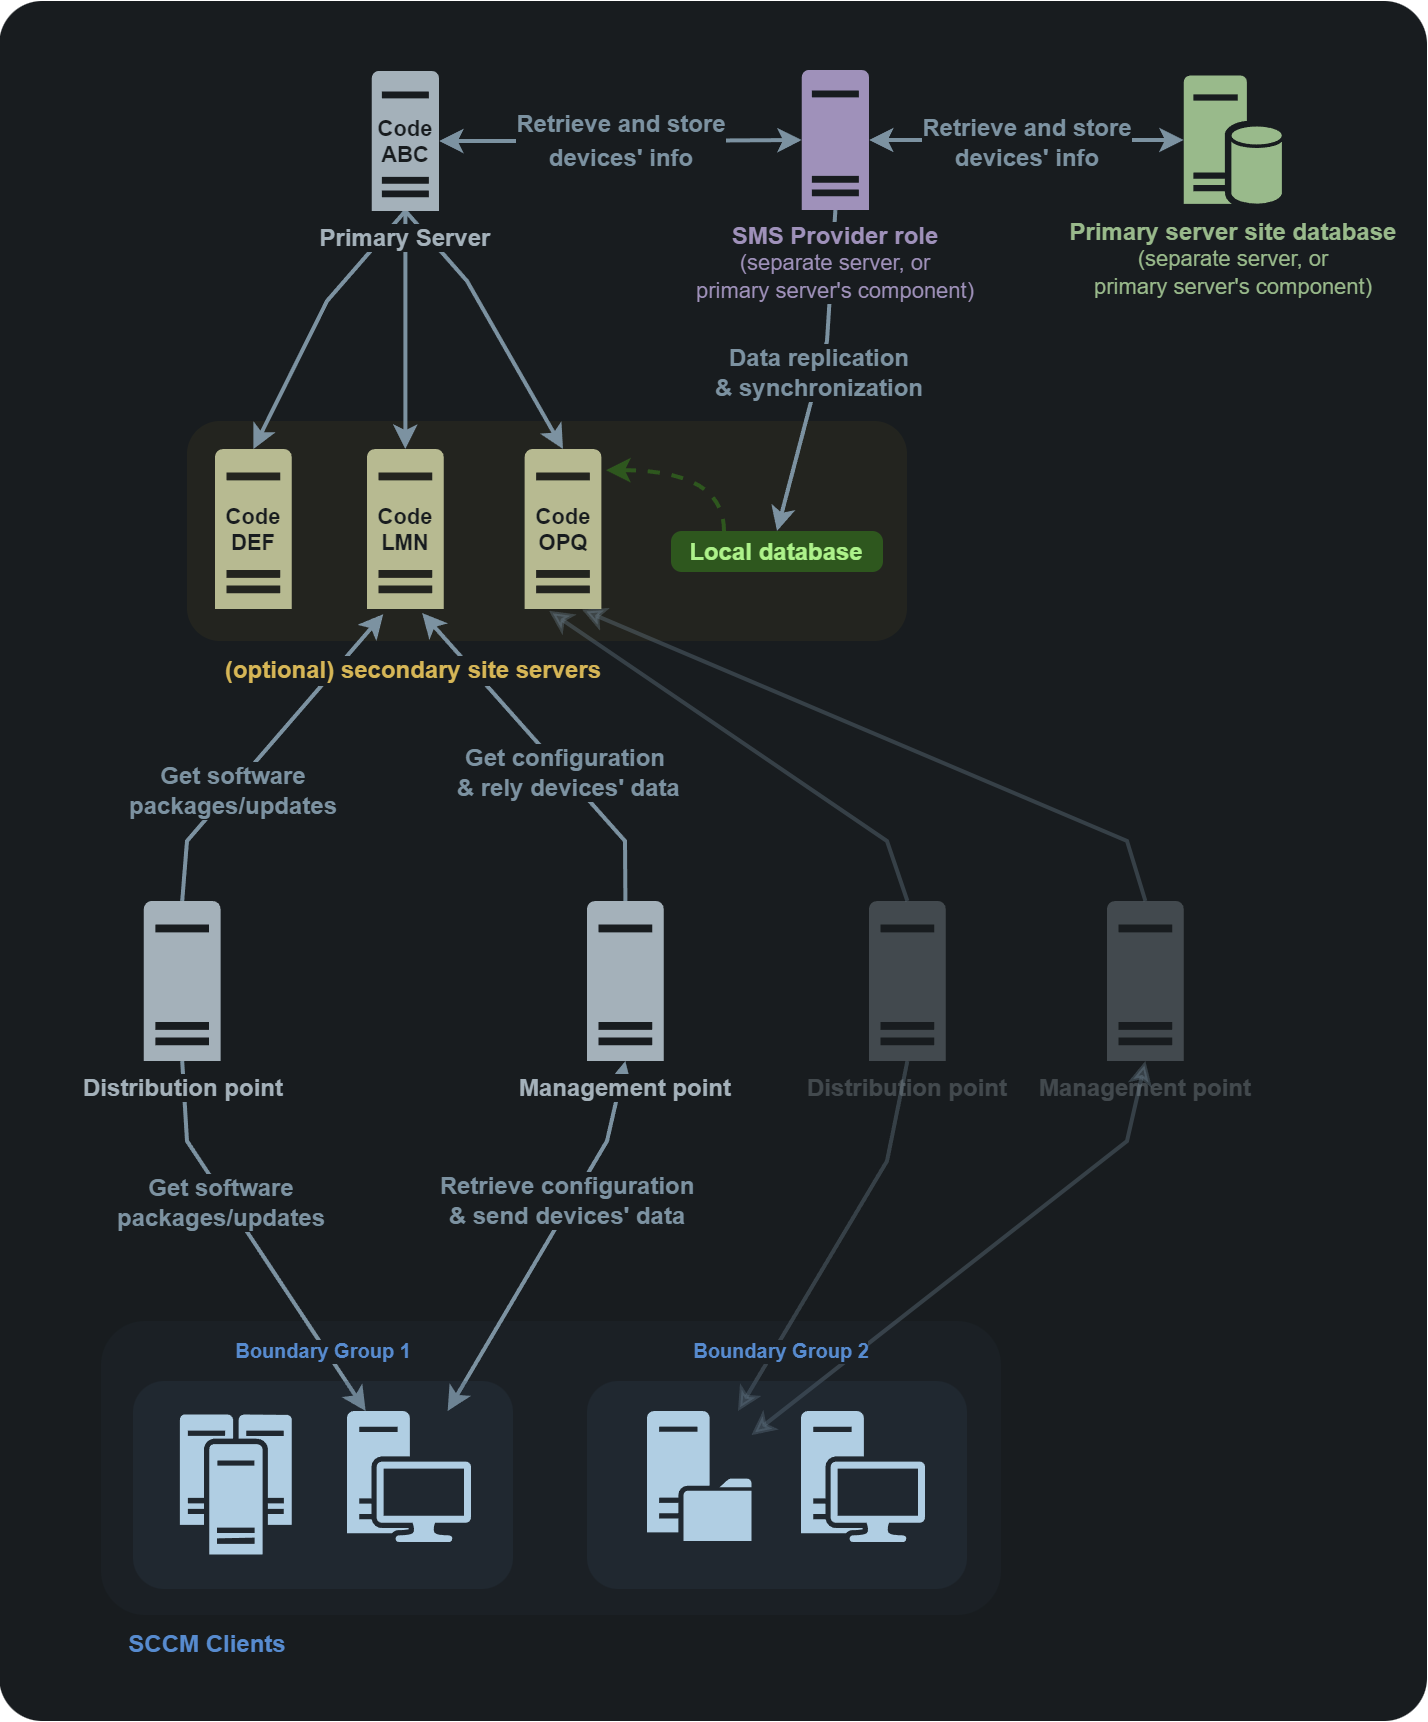
Typical multi-site architecture
Deployment types
When SCCM is installed in an Active Directory, the clients can be deployed on the workstations by six different ways:
- Client push installation (default)
- Software update-based installation
- Group Policy installation
- Manual installation
- Logon script installation
- Package and program installation
Client push installation
The first way of deploying SCCM is the Client push installation method, which is the default one and the least secure.
This installation will use "client push accounts". They are service accounts with local administrative rights on the assets where SCCM will have to deploy some stuff. The system administrator creates groups of endpoints and for each of those, one "client push account". For each group, only one "client push account" can authenticate with administrator rights on the assets of this group. Thus, if an account is compromised, only the members of the corresponding group can be compromised in turn.
When the SCCM deployment is launched, it will basically try to authenticate with each client push accounts on each asset, and if the authentication fails, SCCM will try the next account in line. When the authentication succeeds, it moves to the following asset, and so on until the deployment is complete.
SCCM deployment via Client push installation is service accounts credentials spraying in a nutshell.
Nota bene, there is a feature (not enabled by default) allowing for automatic client push installation on all discovered clients in a boundary group in an SCCM site.
Practice
Attack path overview
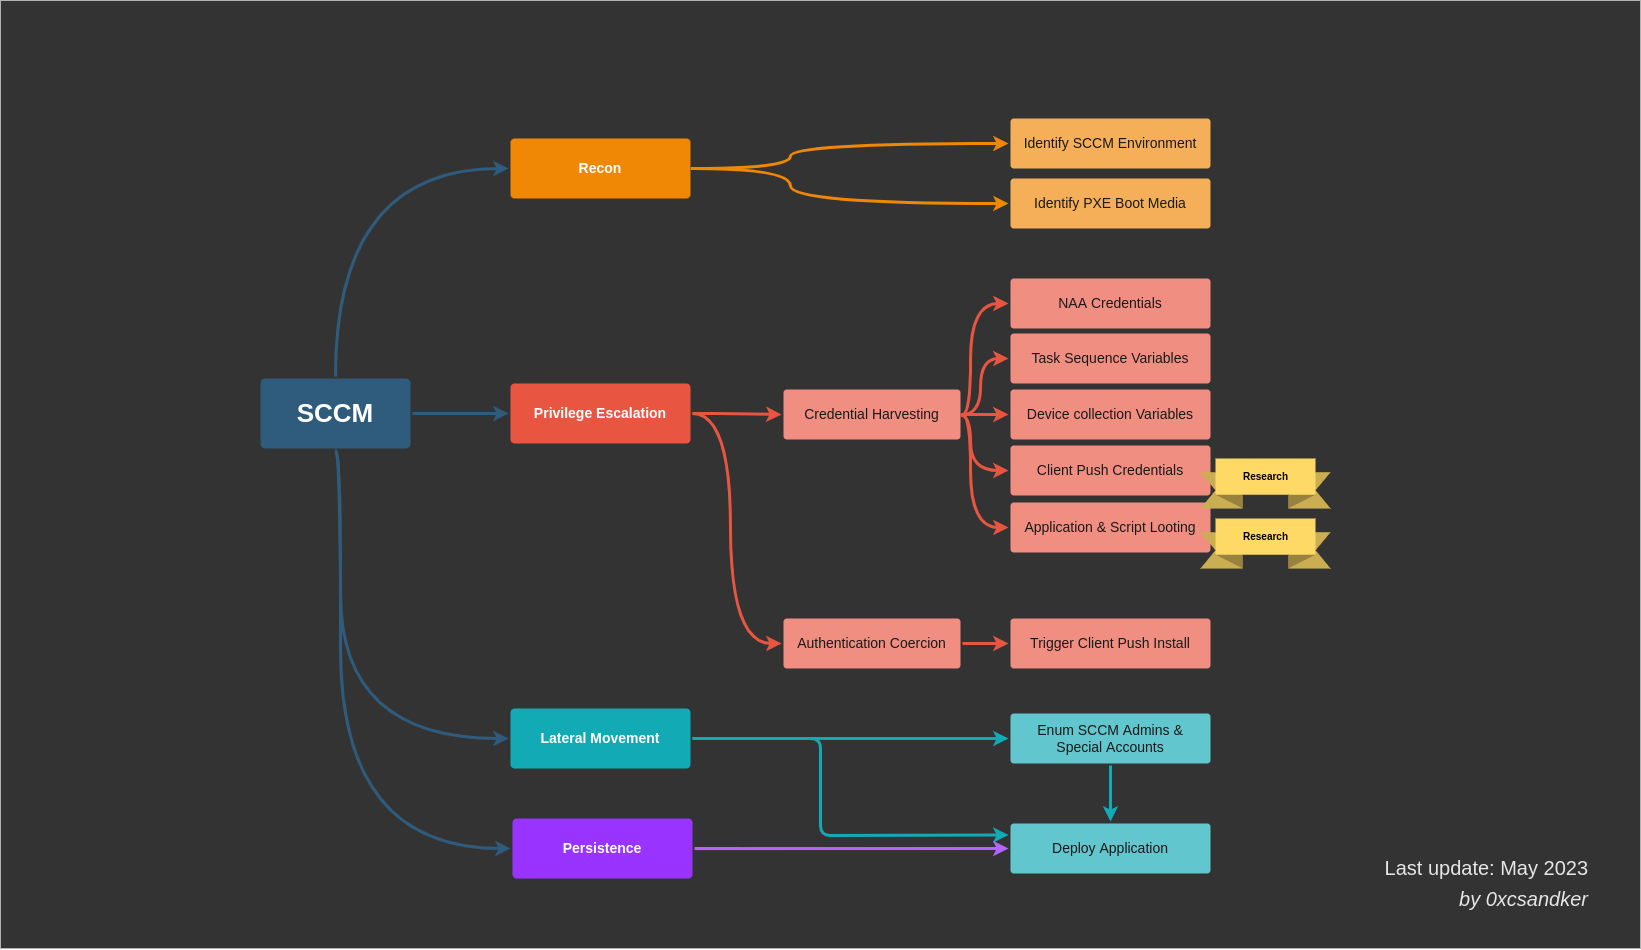
SCCM Attack Surface Overview
Recon
SCCM reconnaissance can be performed in many ways. The goal is to enumerate whether SCCM is present in a target network, and which are the assets related to it.
pxethiefy.py (Python), which is based on PXEThief, can be used to query for PXE boot media. The Pre-Boot Execution Environment (PXE) is a mechanism for booting a computer over the network. Specifically, instead of booting from a CD drive, USB key or hard disk and finding the boot program, the PC will use the network to read such a program from the PXE server.
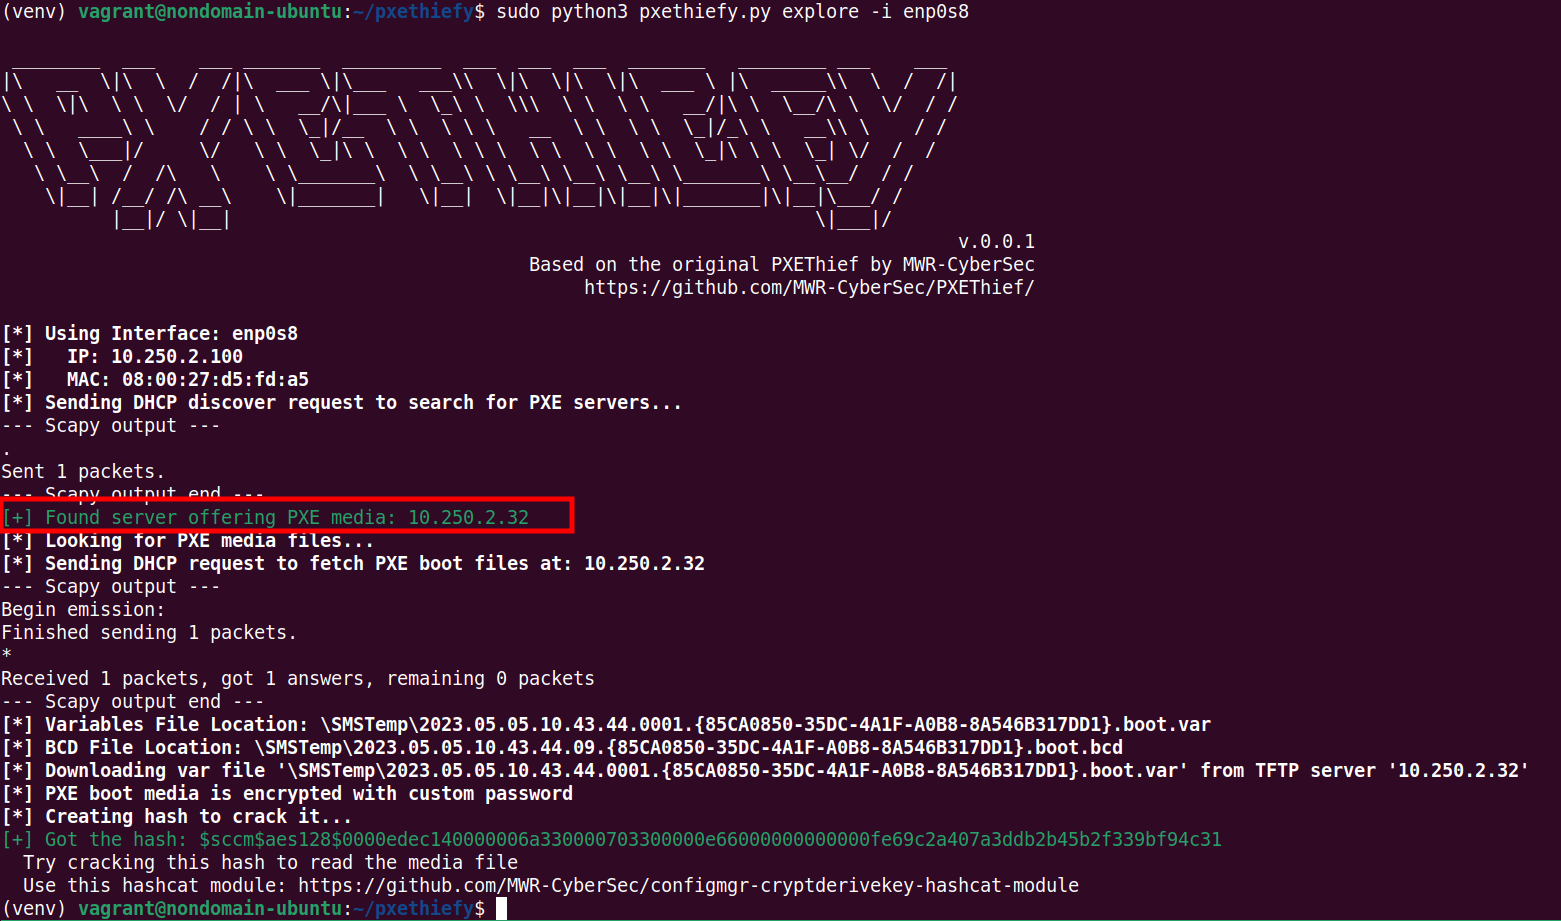
There are a few things to note:
- pxethiefy.py uses broadcast requests to request DHCP PXE boot options. An SCCM setup does not have to support PXE boot and a "found" PXE server does not have to be an SCCM component. Be cautious of false positive results.
- In this case a PXE server was found and PXE media was downloaded. The location of the PXE media on the TFTP server is
\SMSTemp\..., which indicates that this is indeed an SCCM server.
sccmhunter (Python) can also be used to explore the Active Directory and search for SCCM/MECM assets. For this tool, a first user account is required. The first step is to retrieve the different assets in the LDAP annuary, and extract information from the identified servers SMB shares.
For each server, the extracted information are :
- the SCCM site code
- if the server is a Central Administration Site (CAS) or not
- the SMB signing status (useful to perform later NTLM relay attacks)
- if the server is the SCCM Primary Site server or not
- if it is the SCCM Distribution Point or not
- if it is the SCCM SMS Provider or not
- if there are the WSUS and MSSQL services running on it or not
# Find the assets in the LDAP configuration
sccmhunter.py find -u $USER -p $PASSWORD -d $DOMAIN -dc-ip $DC

# Retrieve informations regarding the identified servers and save PXE variables
sccmhunter.py smb -u $USER -p $PASSWORD -d $DOMAIN -dc-ip $DC -save
When information gathering is finished, the second step is to display the results with the show command:
# View the SMB configurations and running services
sccmhunter.py show -smb

# View the users
sccmhunter.py show -user

# View the servers
sccmhunter.py show -computers

# View everything
sccmhunter.py show -all
Abuse
The different phases of an SCCM environment compromise are detailled in the following sections.
Privilege Escalation
This page will describe how to compromise a SCCM infrastructure.
Read the privilege-escalation section for more insight
Post-exploitation (i.e. lateral movement)
After the SCCM infrastructure compromise, this page will describe how to pivot through the network with the help of the SCCM features.
Read the lateral-movement section for more insight
Resources
https://enigma0x3.net/2016/02/
https://docs.microsoft.com/en-us/powershell/module/configurationmanager/?view=sccm-ps
https://learn.microsoft.com/en-us/mem/configmgr/core/servers/deploy/configure/boundary-groups
https://posts.specterops.io/the-phantom-credentials-of-sccm-why-the-naa-wont-die-332ac7aa1ab9
https://blog.xpnsec.com/unobfuscating-network-access-accounts/
https://posts.specterops.io/sccm-site-takeover-via-automatic-client-push-installation-f567ec80d5b1
https://posts.specterops.io/coercing-ntlm-authentication-from-sccm-e6e23ea8260a
https://posts.specterops.io/site-takeover-via-sccms-adminservice-api-d932e22b2bf
https://posts.specterops.io/sccm-hierarchy-takeover-41929c61e087
https://posts.specterops.io/sccm-hierarchy-takeover-with-high-availability-7dcbd3696b43
https://github.com/subat0mik/Misconfiguration-Manager/tree/main/attack-techniques